


NEW: SG AI – Your AI Assistant for TYPO3 – SEO, (image-)text, images & more!
0 Comments // Reading Time: 23 min.
Welcome to the world of Jetbrains PhpStorm. In this article you will learn about lots of tips & tricks for this IDE, which plugins you should use, e.g. for working with TypoScript and Fluid Templates, and how to debug PHP code with PhpStorm.
What is PhpStorm?
PhpStorm is a commercial cross-platform IDE built by JetBrains on their IntelliJ IDEA platform used mainly for PHP programming. It provides a feature-packed editor for PHP, HTML, CSS and JavaScript. Some key features are on-the-fly code analysis and error checking, syntax highlighting, code completion and extended code formatting options. The PHP editor supports PHP 5.3 through 5.6 and PHP 7.0 through 7.3 and can be used for both modern and legacy PHP-based projects.
The functionality of PhpStorm can be expanded further by the user through plugins created for the IntelliJ Platform. Further below we listed some useful plugins for working with TYPO3 and explain how you can install them.
The development environment also provides support for SQL and databases, remote deployment over FTP, SFTP, FTPS etc. with automatic synchronization, direct version control system integration and for Vagrant, Docker, SSH console and other remote tools.
PhpStorm also features tools for debugging and testing, for example through Xdebug which is explained in detail further below.
Download and Installation of PhpStorm
PhpStorm can be installed on Windows, macOS and Linux. All downloads include an evaluation license key for a free 30-day trial.
Linux Installation
If you use Ubuntu 16.04 or later you can run the command
sudo snap install phpstorm --classic
on your command line to download and install PhpStorm as a snap package.
Otherwise, you can download a tar.gz file on JetBrains' website. Then you need to unpack the downloaded package using the command
tar -xzf PhpStorm-2018.2.2.tar.gz
and run PhpStorm.sh from the bin subdirectory.
macOS Installation
JetBrains provides a Disk Image file (dmg) to download from their website. For the installation, you need to mount the Disk Image file as another disk in your system and copy PhpStorm to your Applications folder.
PhpStorm Plugins for TYPO3
We highly recommend you use our TypoScript- and our Fluid-Plugin for PhpStorm if you want to work with TYPO3.
To install the plugins, follow these steps:
- In PhpStorm, open the Settings menu by pressing Ctrl+Alt+S (⌘+,) or by clicking on 'File' -> 'Settings' (Linux) or 'PhpStorm' -> 'Preferences' (macOS).
- On the left-hand side, click on 'Plugins'.
- Click 'Install plugin from disk...' on the bottom right of the window.
- Select the jar file you downloaded earlier.
- Click 'Apply'.
- Restart PhpStorm.
TypoScript Support for PhpStorm
To support your regular work with TypoScript, we created this plugin for PhpStorm. It offers functionality to optimize the time spent on maintenance and development and to reduce sources of potential errors for programmers, as well as integrators.
The current core features:
- Code Highlighting / Folding / Formatting
- Code Auto Completion with Multi-File-Support
- Code Quick Documentation (Ctrl+Q, ^+J on macOS)
- Structure Tree
- Breadcrumb
- Error Detection
If you want further information about this plugin, please visit our product page (currently only in German).
Fluid-Support for PhpStorm
We created this PhpSorm-Plugin to support your work on Fluid Templates.
The current core features:
- Auto-completion for Fluid Layouts, Partials, Sections, ViewHelpers, inline ViewHelpers, ViewHelper arguments and most of the controller view parameters
- Quick documentation for Fluid ViewHelpers, inline ViewHelpers and the ViewHelper arguments
- Jumping to the specific files: To the Partials, Layout, Sections within the Layout, controller by clicking on the controller view parameters,
- ViewHelper, inline ViewHelpers and ViewHelper arguments
- Code highlighting for inline ViewHelpers
- Error detection for inline ViewHelpers
- Possible error annotations for inline ViewHelpers and ViewHelper usages
- Brace matching for inline ViewHelpers
If you want further information about this plugin, please visit our product page (currently only in German).
Other Helpful Plugins
Below you can find other plugins we recommend for working with TYPO3 in PhpStorm.
To install the plugins, follow these simple steps:
- In PhpStorm, open the Settings menu by pressing Ctrl+Alt+S (⌘+,) or by clicking on 'File' -> 'Settings' (Linux) or 'PhpStorm' -> 'Preferences' (macOS).
- On the left-hand side, click on 'Plugins'.
- Click 'Browse repositories...' on the bottom of the window.
- In the newly opened window search for the plugin's name and select the plugin on the left.
- On the right-hand side, click on the green 'Install' button.
- Close the window.
- Click 'Apply'
- Restart PhpStorm.
Php Inspections (EA Extended)
Php Inspections detects errors and improvable parts in PHP code and highlights it. The plugin also recommends solutions and improvements you can access by pressing Alt+Enter (⌥+Enter) when your cursor is at the highlighted position.
Php Inspections covers:
- issues related to architecture
- weak types control and possible code construct simplifications
- performance, compatibility and security issues
- non-optimal, duplicate and suspicious "if" conditions
- validation of magic methods usage
- regular expressions
- a variety of time-consuming bugs
- PhpUnit API usage
You can find more details and downloads in the JetBrains Plugins Repository.
TYPO3 CMS Plugin
The TYPO3 CMS Plugin provides many features for the use of PhpStorm while working with TYPO3. The plugin introduces TypeProviders for
GeneralUtility::makeInstanceGeneralUtility::makeInstanceServiceObjectManager::get$GLOBALS['TYPO3_DB'],$GLOBALS['TSFE']and$GLOBALS['BE_USER'],
and CompletionContributors for
UriBuilder::buildUriFromRouteBackendUtility::getAjaxUrlandIconFactory::getIcon.
It also adds annotators to make route references more distinguishable from normal strings and for icon references to core-defined icons. Extbase @inject property injection and QuickFix are included as well. Furthermore, it lets you generate ViewHelpers and ActionControllers and create new TYPO3 Projects in either the classic layout or as a composer based project.
You can find more details and downloads in the JetBrains Plugins Repository.
DynamicReturnTypePlugin
This plugin enables dynamic return types from method/function calls, instead of only static methods. It can use either the instance type of the passed parameter, string lookup or ::class. It can also be used to enable aliasing. The plugin can be configured for:
- Instance method calls
- Static method calls
- Function calls
To calculate the return type it accepts the following:
- Parameter object instance (eg.
new \DOMDocument()as a parameter instance value will infer a DOMDocument will be returned) - Parameter string type (eg.
'\DOMDocument'as a parameter string value will infer a DOMDocument will be returned) - Class constants that resolve to
__CLASS__will resolve similarly to how the::classfeature in 5.5 behaves.
This is a dynamicReturnTypeMeta.json configuration file we use:
{
    // configuration file for PHPStorm Plugin: https://plugins.jetbrains.com/plugin/7251-dynamicreturntypeplugin
    "methodCalls": [
        // Do not add the methods getMock or getAccessibleMock to this configuration
        // because additive type information gets lost. Use comments to define object types.
        {
            "class": "\\TYPO3\\CMS\\Core\\Utility\\GeneralUtility",
            "method": "makeInstance",
            "position": 0
        },
        {
            "class": "\\TYPO3\\CMS\\Extbase\\Object\\ObjectManagerInterface",
            "method": "get",
            "position": 0
        }
    ],
    "functionCalls": [
    ]
}
You can find more details and downloads in the JetBrains Plugins Repository. You can also find a link to a demo environment used to verify edge cases are catered for.
Debugging with Xdebug
Installing Xdebug on Your Server
To use Xdebug, you first have to install it on your server. You need to take these steps:
- Download a version of the Xdebug extension that is compatible with your PHP version from the official Xdebug website.
- Copy the extension file to a location on your web server that is accessible by the web server.
Add these lines at the end of your php.ini file:
[Xdebug] zend_extension=<full_path_to_xdebug_extension> xdebug.remote_enable=1 xdebug.remote_host=<the host where PhpStorm is running (e.g. localhost)> xdebug.remote_port=<the port to which Xdebug tries to connect on the host where PhpStorm is running (default 9000)>
The value of 'xdebug.remote_host' can be a host name or an IP address.
The value of 'xdebug.remote_port' is 9000 by default in Xdebug and PhpStorm. Ensure that the specified port is open on your client machine.
For additional information, check the official Xdebug Documentation.- Restart the web server
- Check your installation with one of these methods:
- Execute
php --version
in the Terminal. You should see a line containingwith Xdebug v<version nr.> Create a file containing:
<?php phpinfo();
Open a page corresponding to this file and check the output of
phpinfo().
- Execute
Installing and Configuring the Xdebug Extension for Chrome
To use Xdebug for debugging in PhpStorm, you first need to install the Xdebug helper extension in your browser.
After the installation, right-click on the grey bug in Chrome's extension list and select 'Options'. Then, under "IDE key" select 'PhpStorm', enter a key, e.g. "PHPSTORM", and click 'Save'.
Configure PHP Remote Debug
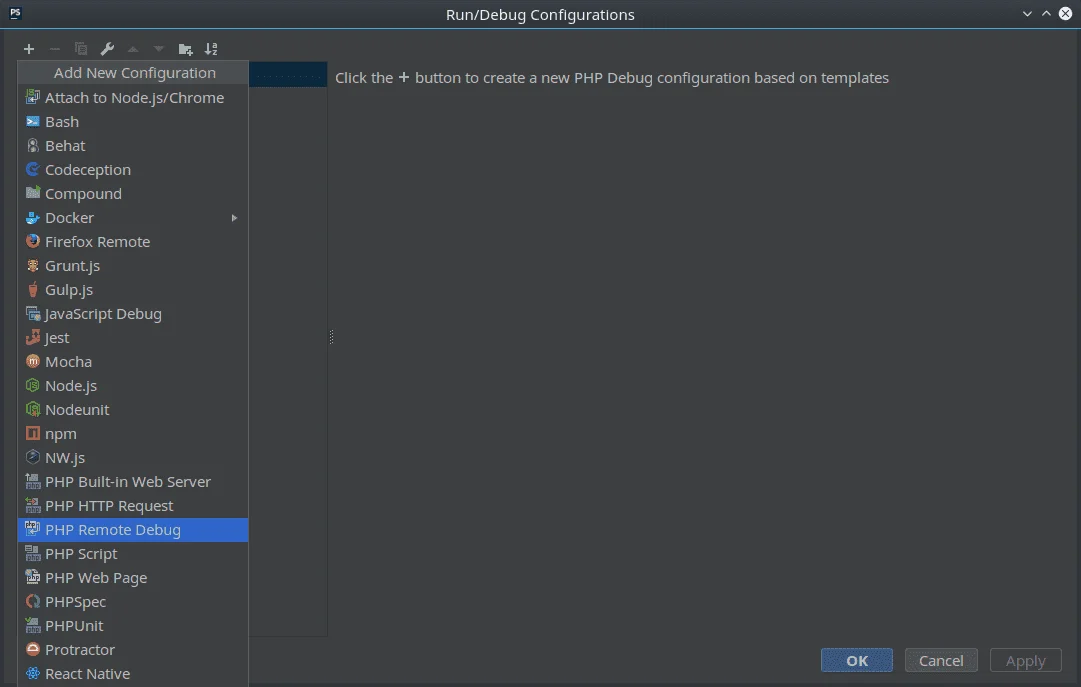
- In the PhpStorm menu select 'Run' -> 'Edit Configurations'. A new window pops up.
- In the upper left corner, click the plus sign.
- Choose "PHP Remote Debug".
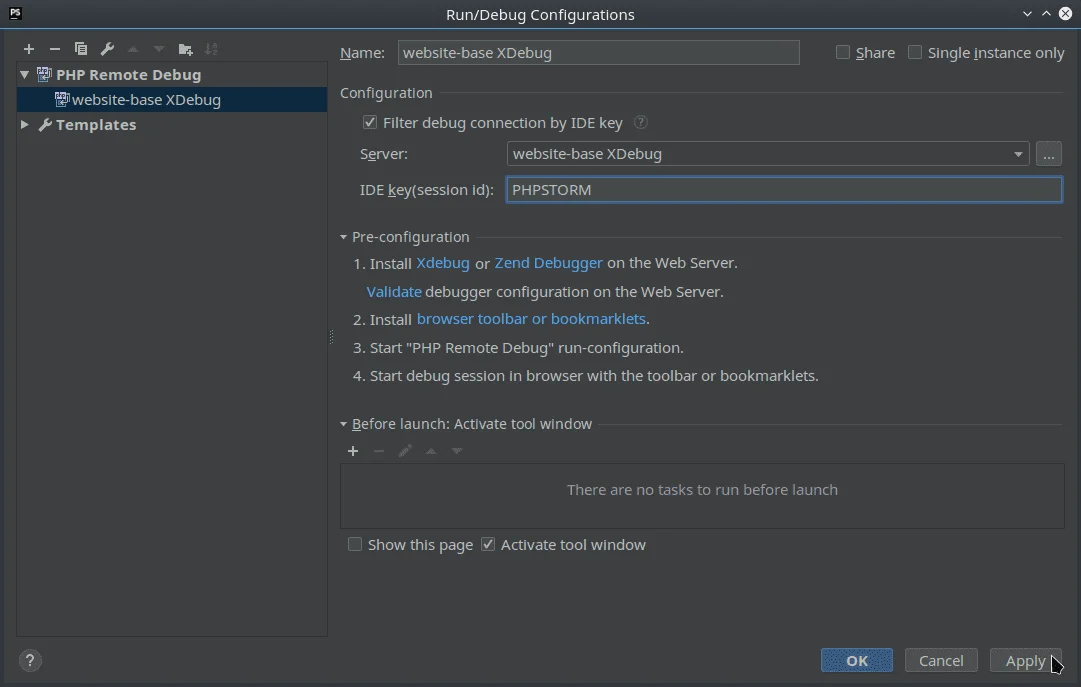
- On the right-hand side, do:
- Enter a name
- Tick the "Filter debug connection by IDE key" checkbox
- Set the IDE key (session id) to "PHPSTORM"
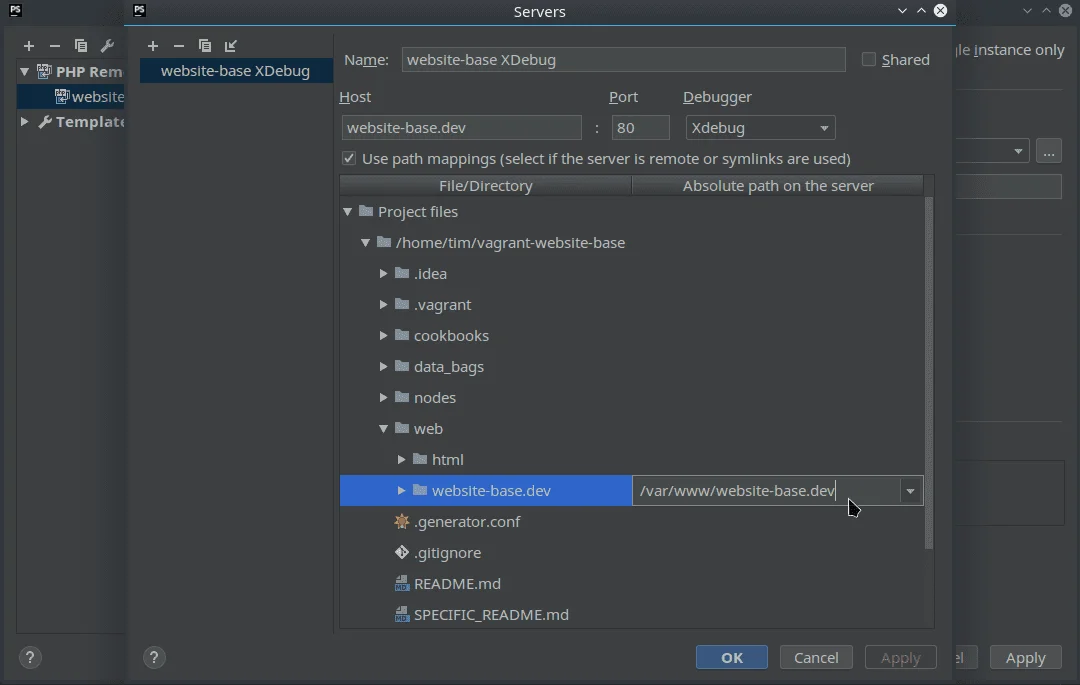
- Click the three dots next to "Server". Another window opens.
- In the upper left corner, click the plus sign.
- On the right-hand side, do:
- Enter a name
- Enter your website's host
- For the debugger, choose "Xdebug"
- Tick the "use path mappings" checkbox
- In the file tree, move to the root directory of your website and add the corresponding absolute path on the server by clicking on the pen icon
- Hit 'Apply' and close all windows.
See these images for help:

Using Xdebug in PhpStorm
Once this is configured, you can start using Xdebug. First, you need to start the Chrome extension by left-clicking the extension's button in Chrome and clicking 'Debug'. The button should now be green. In PhpStorm there will also be a button in form of a bug. Click it to enter Debugging mode. This will open the Debug Tool Window at the bottom of the PhpStorm IDE.
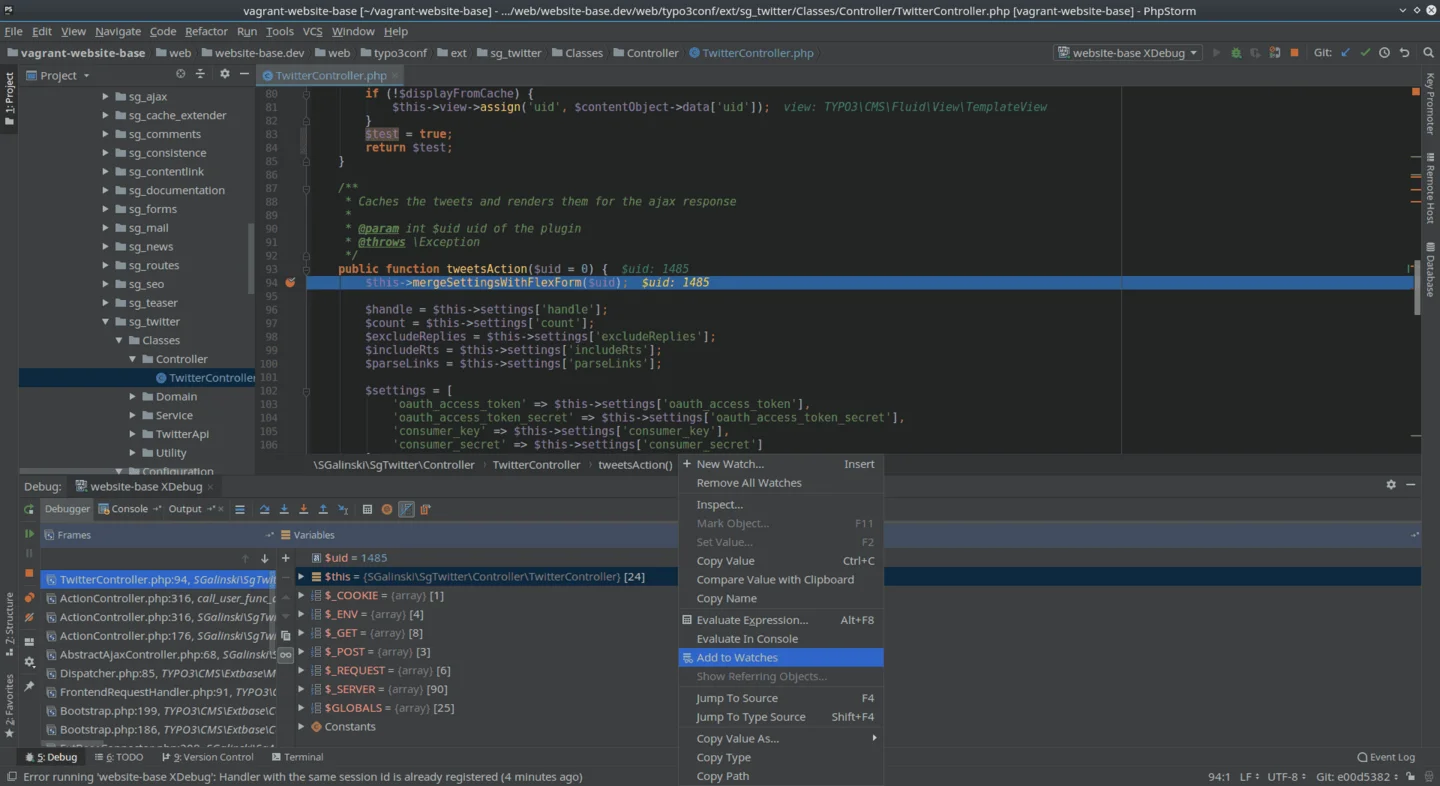
Here, the most important section can be found under 'Debugger'. When you add a breakpoint to your code, the code execution will halt once the breakpoint is reached and you will see a list of all variables with their corresponding values in the 'Debugger' window.
If you want to keep track of a specific variable's value, you can right-click it and select 'Add to Watches'. This pins the variable to the top of the variable list until you remove the Watch. This way you don't have to search for it everytime you let your code run further.
To learn about all the buttons and functionalities of the Debug Tool Window, please visit Intellij's IDEA Help.
Useful Shortcuts for Linux and Mac
PhpStorm offers a vast variety of keyboard shortcuts you can use to enhance your work. After the installation, the keyboard shortcuts will be set to the default of PhpStorm. First, you should change a setting to enable shortcuts optimized for your system.
How to Set the Shortcut Map for Your OS
On some operating systems the default keymap of PhpStorm interferes with systemwide keyboard shortcuts, e.g. on KDE pressing Ctrl+Alt+L locks the screen and in PhpStorm by default, this is set to reformat your code. PhpStorm offers a set of keymaps to avoid this type of conflict. You can also choose to use another IDE's default keymap if you are already accustomed to a different IDE.

This is how you change the default setting:
- Open the PhpStorm settings by pressing Ctrl+Alt+S (⌘+,).
- Select 'Keymap' in the navigation on the left.
- Choose your OS or IDE in the drop-down menu on the right-hand side.
- Hit 'Apply'.
Afterwards, you can customize your keyboard map below in the same window to assign your own shortcuts for any commands.
Custom settings for keymaps are stored in:
- Linux: <User home>/.PhpStorm<xx>/config/keymaps
- macOS: ~/Library/Preferences/PhpStorm<xx>/keymaps/
These keymap files contain only the differences between the personalised and the parent keymap.
How to Resolve Warnings and Errors
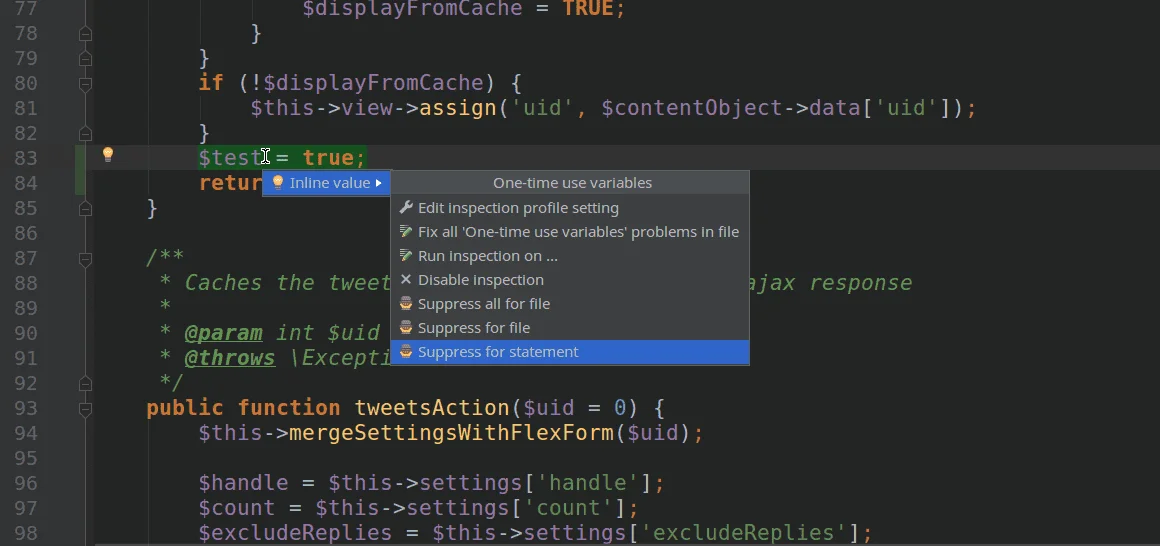
Whenever your IDE detects imperfect code, it will highlight the improvable section and let a yellow or red light bulb appear above the caret when it moves into the highlighted section. You can then press Alt+Enter (⌥+Enter) to summon a context menu. If there is a recommended action you can select it with the Up-/Down-Arrow keys and press Enter to let PhpStorm make the desired change. Alternatively, you may click on the light bulb and select the action this way.
Sometimes you need to deliberately write code your IDE sees as non-optimal. This will often cause PhpStorm to show a negligible warning you may want to suppress. You can do this in a few easy steps:
- Open the warning context menu
- Extend one of the lines with a light bulb by pressing the Right-Arrow key.
- Choose where to suppress this error: in the current statement or file. You can also choose to suppress all warnings in the current file.
As said before, you can automatically format your code to the preferred style guidelines by pressing Ctrl+Alt+L (⌘+⌥+L).
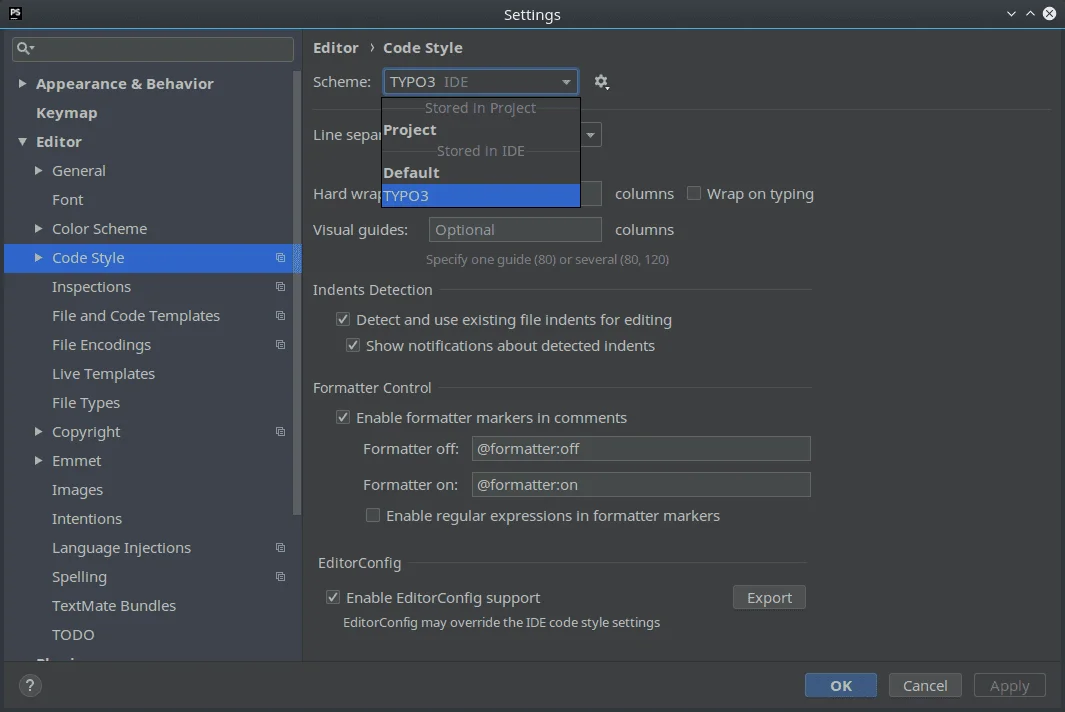
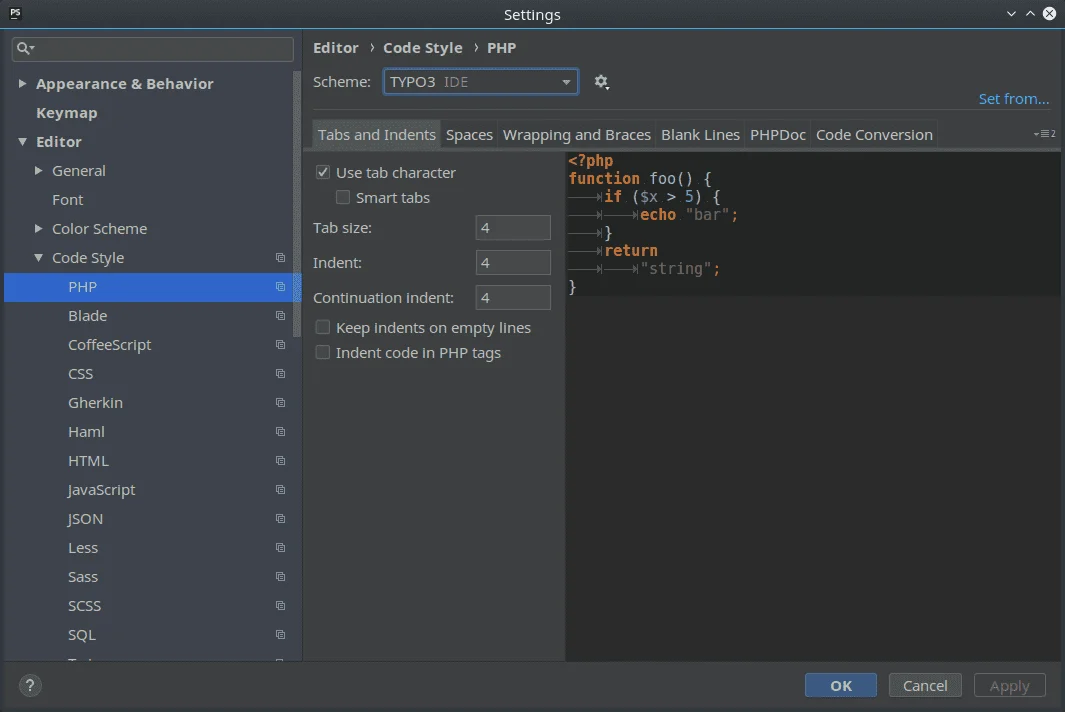
You can adapt the code style guidelines by opening the settings, going to 'Editor' -> 'Code Style' and selecting the code style scheme to be used as the base for your custom coding style. For further personalisation select a language and configure the code style preferences individually.
As said before, you can automatically format your code to the preferred style guidelines by pressing Ctrl+Alt+L (⌘+⌥+L).
You can adapt the code style guidelines by opening the settings, going to 'Editor' -> 'Code Style' and selecting the code style scheme to be used as the base for your custom coding style. For further personalisation select a language and configure the code style preferences individually.
The most important shortcut you need to remember now is Ctrl+Shift+A (⌘+⇧+A) which lets you search for any action and see its shortcut.
Undoing an action can be achieved with the usual command Ctrl+Z (⌘+Z), but to redo an action you need to press Ctrl+Shift+Z (⌘+^+Z). Pressing Ctrl+Y (⌘+Y), a common 'Redo' command, deletes the current line. You may want to remap these commands to avoid deleting code unintentionally.
With Ctrl+F/R (⌘+F/R) you can use the usual Find and Replace features.
PhpStorm remembers multiple clipboard contents. You can paste them into your file using Ctrl+Shift+V (⌘+⇧+V).
Using Alt+Insert (⌘+N or ^+N or ^+Enter) makes PhpStorm generate code like Setters, Getters and Constructors.
Ctrl+Space makes the code hinting dialogue for basic code completion pop up if it is not shown automatically.
When PhpStorm detects a problem, a light bulb will pop up above your mouse or cursor when you move into the area. You can either click on the light bulb or press Alt+Enter (⌥+Enter) to see suggested solutions.
This also gives you a list of editing options, e.g. if you have a PHP string containing an HTML snippet this lets you choose to "Edit HTML Fragment" which opens a dedicated HTML editor.
The same key combination will give you a list of best practice hints detected by extensions like Php Inspections.
With Alt+Shift+↑/↓ (⌥+⇧+↑/↓) you can move a single line up or down.
Using Ctrl+Shift+↑/↓ (⌘+⇧+↑/↓) allows you to move an entire section of code similarly.
A powerful search tool is "Search Everywhere": You can open this menu by double-pressing Shift (⇧⇧). This allows you to find anything within your project or PhpStorm.
With Ctrl+N (⌘+N) you can open any class and with Ctrl+Shift+N (⌘+⇧+N) any file in your project. You can use abbreviations in the search and follow your search by ":XX" where "XX" is a line number to jump to a specific line in the file.
The demo video shows the usage of Ctrl+Shift+N with abbreviations and a line number.
To jump to a specific position in your open file, you can press Ctrl+G (⌘+G) and enter the desired position in the summoned window.
The correct format to use is "LL:CC" where "LL" is a line number and "CC" is the column number within that line.
Ctrl+Shift+Backspace (⌘+⇧+⌫) allows you to jump back to your last edit location. Alternatively, you can use the "Forward" and "Back" buttons on your mouse if you have them.
To select a "unit" of code around the caret, you can press Ctrl+W (⌥+↑). Pressing this again expands the selection to include the next block of code.
You can select an entire file by using this command multiple times consecutively, as shown in the demo video.
You can select code by columns by dragging with the middle mouse button. This is good for selecting deeply indented code without the preceding whitespace.
In case you don't have a middle mouse button, use Shift+Alt+Insert (⇧+⌘+8) to enter Column Selection Mode. The same key combination is used to exit this mode.
Holding down Ctrl (⌘) when hovering over variables or methods shows more details like their full names or the location of their declaration.
You can go directly to where a method or a variable is defined by Ctrl+Clicking (⌘+Click) on a method's call or a variable or by pressing Ctrl+B (⌘+B) when your cursor is in the name.
When you hold Alt (⌥) you can click anywhere in your code and add another caret. This way, you can edit in multiple positions at once.
If you refactor (rename) a variable and want the change to apply to all locations where it is used you can right-click -> 'Refactor' to summon the Refactor menu or press Shift+F6 (⇧+F6) to start refactoring instantly.
You can always open a PDF with the default keymap for your system from within PhpStorm by clicking 'Help' -> 'Keymap Reference'. This does not list all available shortcuts, but some of the more frequently used. A more extensive list can be found in Intellij's PhpStorm Help.
We Offer Comprehensive TYPO3 Webinars:
Contact us!
We are a digital agency, which is specialized in the development of digital products. Our core topics are websites and portals with TYPO3, eCommerce with Shopware and Android and iOS-Apps. In addition, we deal with many other topics in the field of web development. Feel free to contact us with your concerns!

Comments and ratings