
NEW: SG AI – YOUR AI ASSISTANT FOR TYPO3 – SEO, (IMAGE-) TEXT, IMAGES & MORE!
0 Comments // Reading Time: 7 min.
The Enterprise CMS TYPO3 is in principle relatively easy to install. There are numerous possibilities for installation, from the use of offered 1-click installation tools, to git or setup via SSH console. However, there are some requirements for the hosting environment that are not met by every web host.
This tutorial describes step-by-step how to install TYPO3 without having to deal with console commands:
Find out more about our hosting recommendation now:
Prerequisites
Since version 8, TYPO3 requires PHP 7.0, which is unfortunately not yet available from every hosting provider. A memory_limit of 128 MB and a max_execution_time of at least 240 seconds should also be available for PHP. In case of doubt it is recommended to ask your webhoster if the requirements are met and if GraphicsMagick or ImageMagick are additionally installed on the webspace.
The exact system requirements in all details can be found in the official documention.
Preparations
1) Check / change PHP version
Please check before installation that the domain uses either PHP version 7.0 or 7.1. As a rule, you will find a setting for this in the customer menu of your web host.
2) Create database
TYPO3 requires a database. Most providers provide MySQL for this purpose. TYPO3 is also compatible with other database types such as MariaDB (which is based on MySQL).
Log into the customer menu at your webhoster and create a new MySQL database there. Please use a secure password and make a note of the access data that will be requested later in the TYPO3 installation tool. This includes the database name, the database user name, the host name and the password. Occasionally, you will also need the port if it differs from the standard port 3306. Your provider will provide you with this information.
3) Download TYPO3
For the installation you need the zip archive of TYPO3, which contains the installation files. Open the website https://get.typo3.org/ in your browser and select the desired version from the available tabs. Then click on the Download button. The files are available either as TAR.GZ or ZIP archives. As a rule, Windows operating systems only support the ZIP format, use this if you have not installed a separate program for archives (e.g. Filezilla).
After the download, the ZIP archive must be unpacked locally on your computer. This is done via the options integrated in your operating system or by means of one of the numerous available and free ZIP programs.
4) Upload TYPO3 to the webspace
After we have unpacked the files, they have to be uploaded to the webspace of your host. This is generally done via an FTP program. Please open the program with which you normally exchange your files between your computer and web space. If you are connecting to your webspace for the first time, you will need the FTP access data. These are the so-called FTP host name, the user name of the FTP account and the associated password. Which FTP program you use does not matter, for Windows Filezilla or WinSCP are recommended, for Mac Cyberduck.
Once you have successfully established an FTP connection, change to the server-side directory where you want to install TYPO3. (Usually below "websites", "html" or "httpdocs")
You can also simply create a new subdirectory with the name "typo3installation", for example. In the FTP program on the page for the local directories, change to the folder in which you previously unpacked the archive with the TYPO3 files.
Finally, copy all files of the folder into the installation directory on your FTP server and wait until the transfer is complete. This may take a few minutes. Leave the FTP program open afterwards.
TYPO3 installation (in 5 steps)
Now we come to the actual installation. To be able to start the installation, the install tool must first be activated. Create a new file with the name "FIRST_INSTALL" (in lowercase or uppercase, without quotation marks and file extension) within the installation directory whose files we just uploaded.
Step 1)
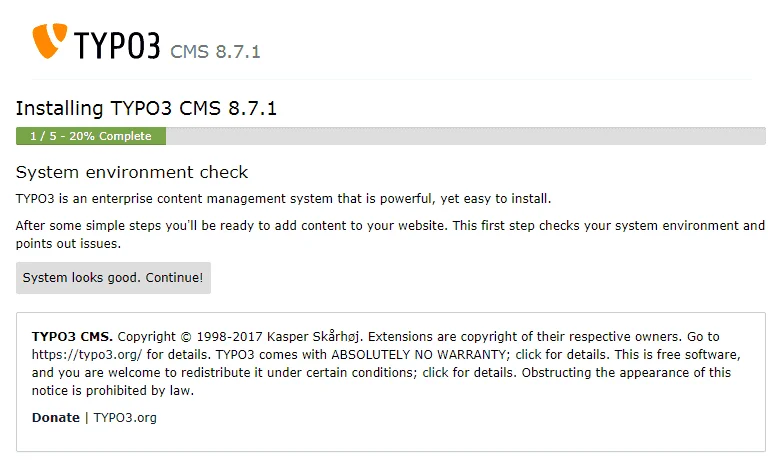
Then please call up your domain and the path to the installation directory in your browser, for example your-domain.end/typo3installation
You should now be greeted by TYPO3 and see the results of the "System environment check". The first time you call it up, it will check whether all the prerequisites for the installation have been met and whether any changes still need to be made.
Click on the grey button to continue.
Step 2)
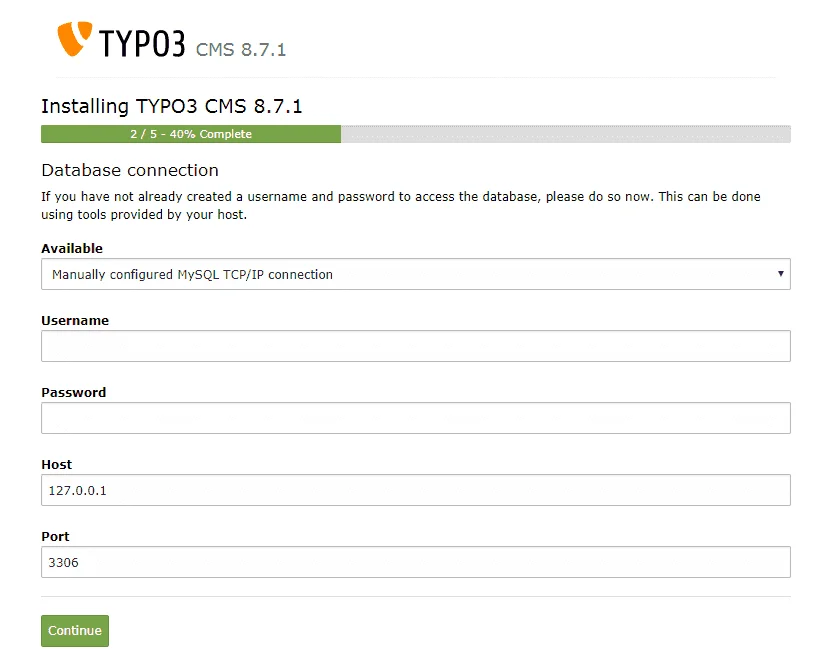
In the second step the access data to the database will be queried. By default, some values for MySQL are already prefilled, so that you only have to enter the database user name and password. Please check at this point whether the host and the port correspond to the specifications of your web host and adjust them if necessary. In many cases this is instead of the IP the name "localhost" or a domain name.
Then click on "Continue" to continue.
Step 3)
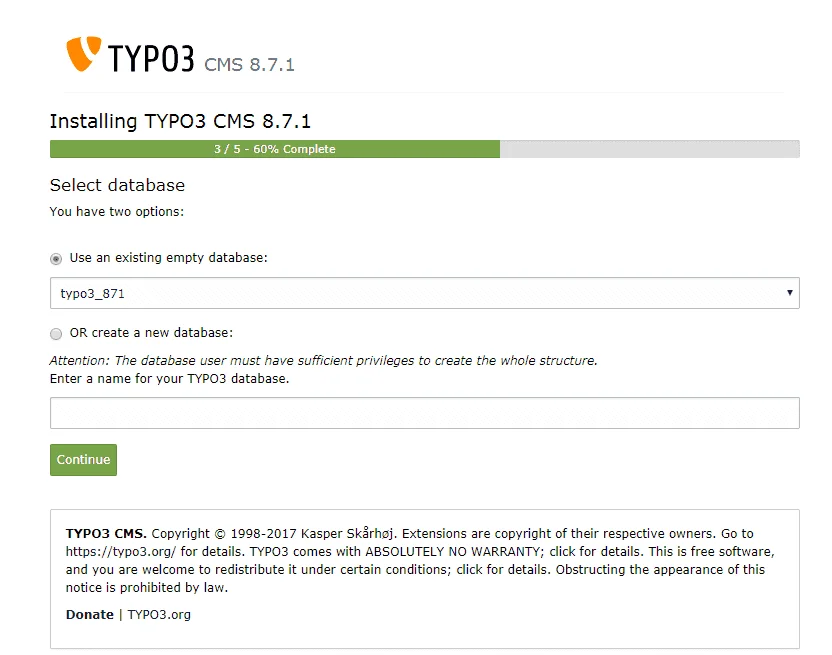
If the access data is correct and TYPO3 can establish a connection, the next step is either to pre-fill the correct database or to create a new one. Please note that it depends on the webhoster whether the database user has the right to create new databases or whether this must be done in the respective customer menu.
Since we already created a database at the beginning, we now select it in the dropdown and continue with a click on "Continue".
Step 4)
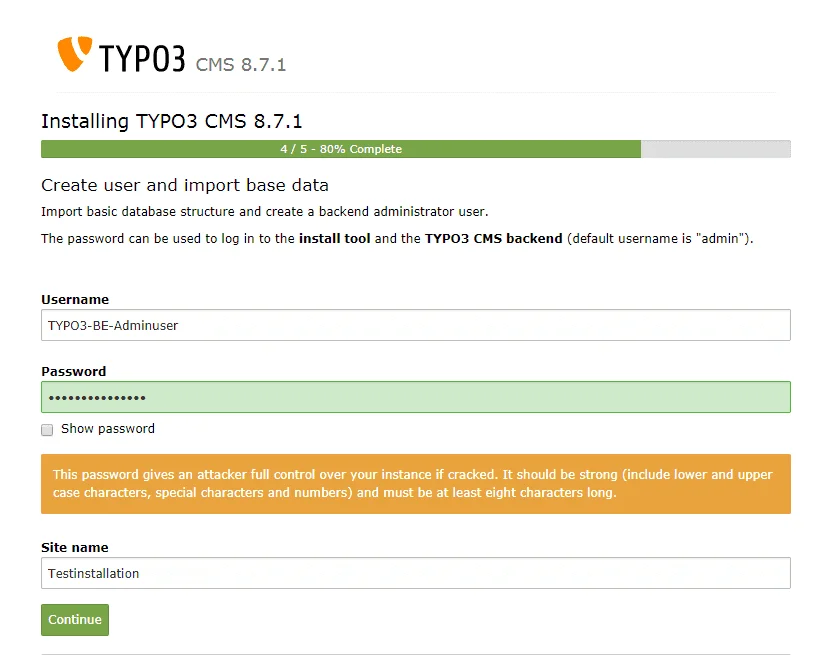
In the fourth step you create the user name for the administrator account of the TYPO3 system. It is important that you create a secure password with at least 8 characters. In addition, you should use a combination of upper and lower case letters, digits and special characters. We also recommend that you do not simply use "admin", "administrator", "typo3" or the domain name as your user name, but rather a name that is not so easy to guess.
Please also specify the name for your website and then click the button at the bottom of the page again to continue.
Step 5)
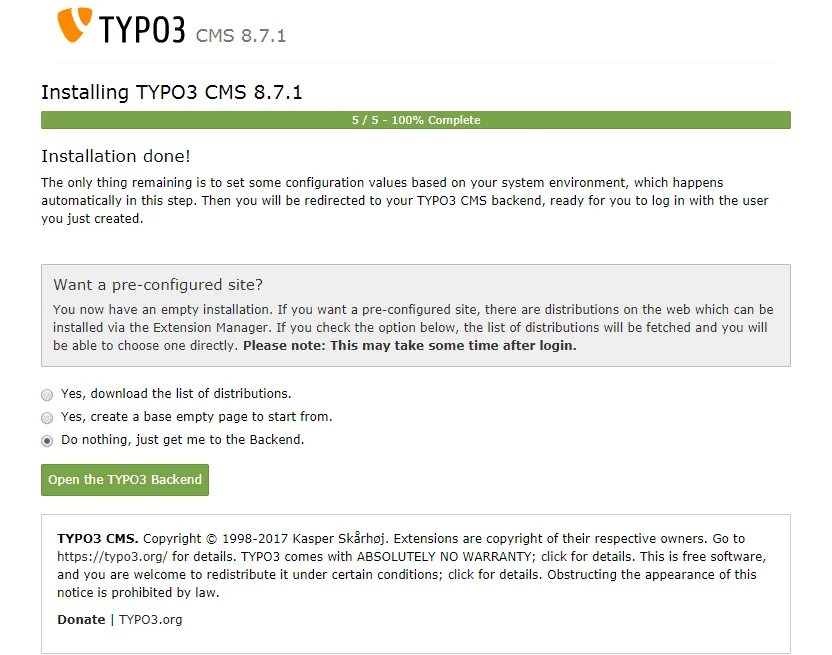
The last step of the installation allows you to choose whether you want demo data or an empty start page. If you choose the option with the demo data, some additional packages will be loaded from the TYPO3 extension catalogue, which you can select after logging into the TYPO3 backend. These are currently three different editions (so-called Distributions), which offer you an insight into the possibilities of TYPO3:
- The official Introduction Package (with all features)
- Bootstrap Kickstart Package (Bootstrap template for websites)
- Aimeos web shop distribution (shop system)
In most cases, the option with an empty page is completely sufficient. You can also skip this step and configure the structure of the pages yourself later. As long as this has not been done, TYPO3 will display an error message when you access the website.
No matter which option you choose, you will be redirected to the TYPO3 backend and the installation is complete.
TYPO3 Backend Login
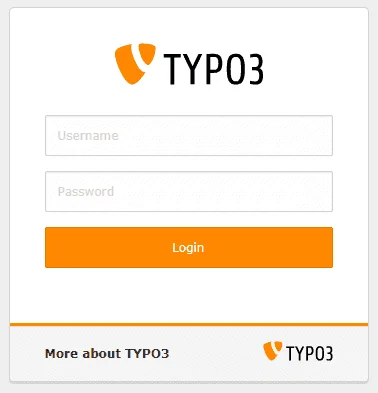
For the login you need the previously created access data of the administrator account. The backend can be reached via the URL of your installation. In our example this is your-domain.endung/typo3installation/typo3
After logging in, you can choose between the three currently available editions, provided you have chosen the version with demo data. In all other cases you will get an overview of installed modules on the start page.
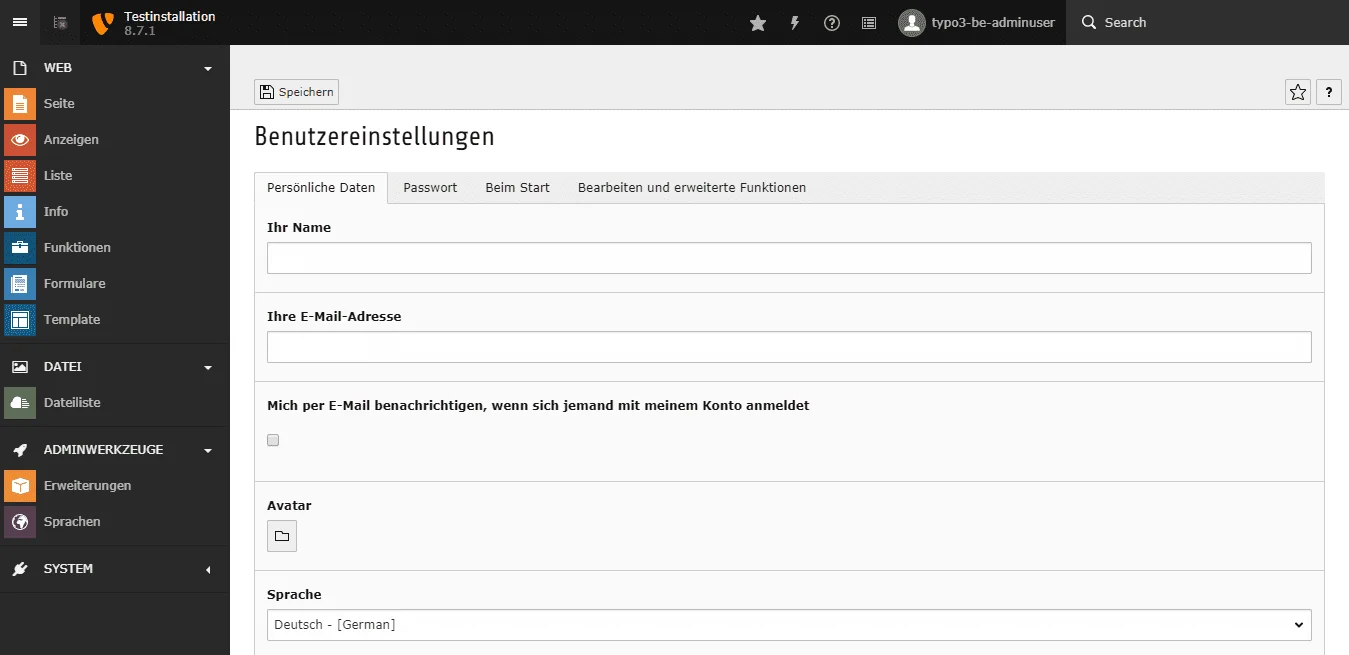
If you would like to change the language, please first click on 'Languages' in the left navigation bar under "Admin Tools". Then use the search for "german" and activate the German language files in the system via the small icon with the plus on it. Afterwards please click on Download on the right side, so that the translation is loaded.
However, since the default language for your user is English, this must also be changed. To do this, click on your user name at the top and then on "User settings". Via the dropdown at "Language" simply select 'German' and confirm your change with "Save".
After logging in again, the language is completely changed.
TYPO3 Hosting
Are you looking for hosting that is tailored to TYPO3 and supports all recommended requirements? Take a look at our rates and benefit from many additional features for professionals and developers.
Guest article by:

Contact us!
We are a digital agency, which is specialized in the development of digital products. Our core topics are websites and portals with TYPO3, eCommerce with Shopware and Android and iOS-Apps. In addition, we deal with many other topics in the field of web development. Feel free to contact us with your concerns!

Comments and ratings