
NEW: SG AI – YOUR AI ASSISTANT FOR TYPO3 – SEO, (IMAGE-) TEXT, IMAGES & MORE!
Text editing in the CKEditor (Rich Text Editor)
The CKEditor Rich Text Editor (RTE) offers a wide range of formatting options for text content. The user interface is similar to familiar word processing software like Word, making it intuitive to use. The inserted formatting is automatically converted into HTML commands. In the TYPO3 backend, the appearance of the text can be approximately recognized, but it is essential to check changes also in the frontend.
Even though the operation of the editor is very similar to other word processing programs, we would like to give you a quick introduction to all functions.
Styles
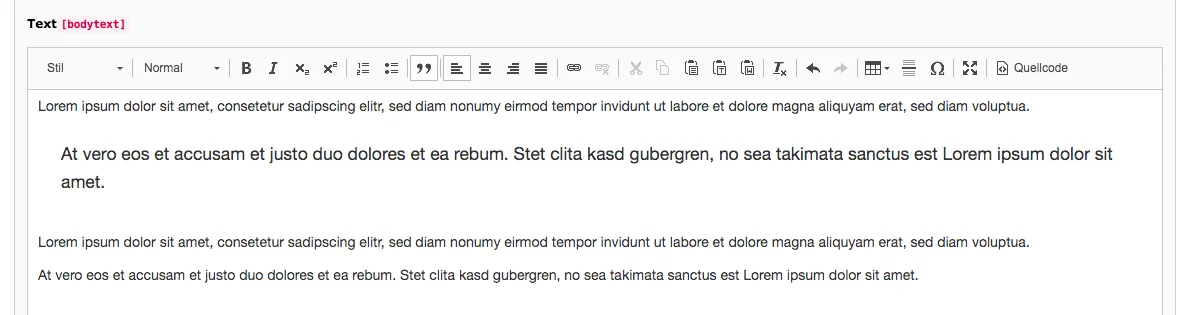
There are two different styles: block styles and text styles. More text styles are available for links than for normal text.
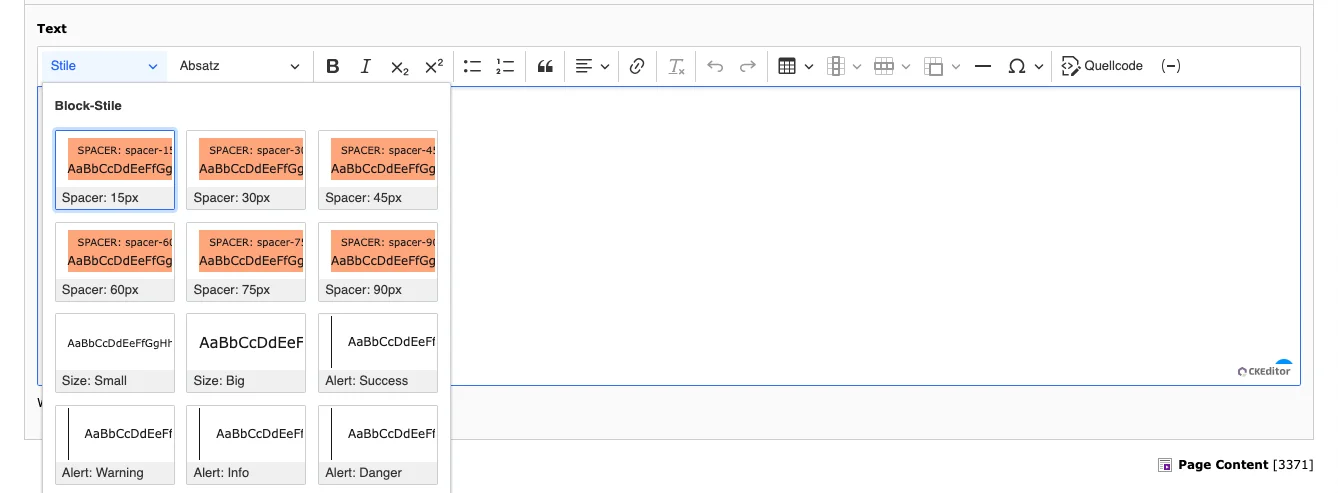
The crucial difference between the styles is the area they affect. Block styles always apply to an entire paragraph. To set a block style in the editor you just need to click in the paragraph you want to format and then select the style you want from the dropdown menu. An entire paragraph will be affected by the change without the need to select anything. This also means that you need to place text in a different paragraph if you want to format it differently/normally.
The colors of the different styles correspond to the default settings of the website base. The design configurator allows you to customize these colors to your corporate design.
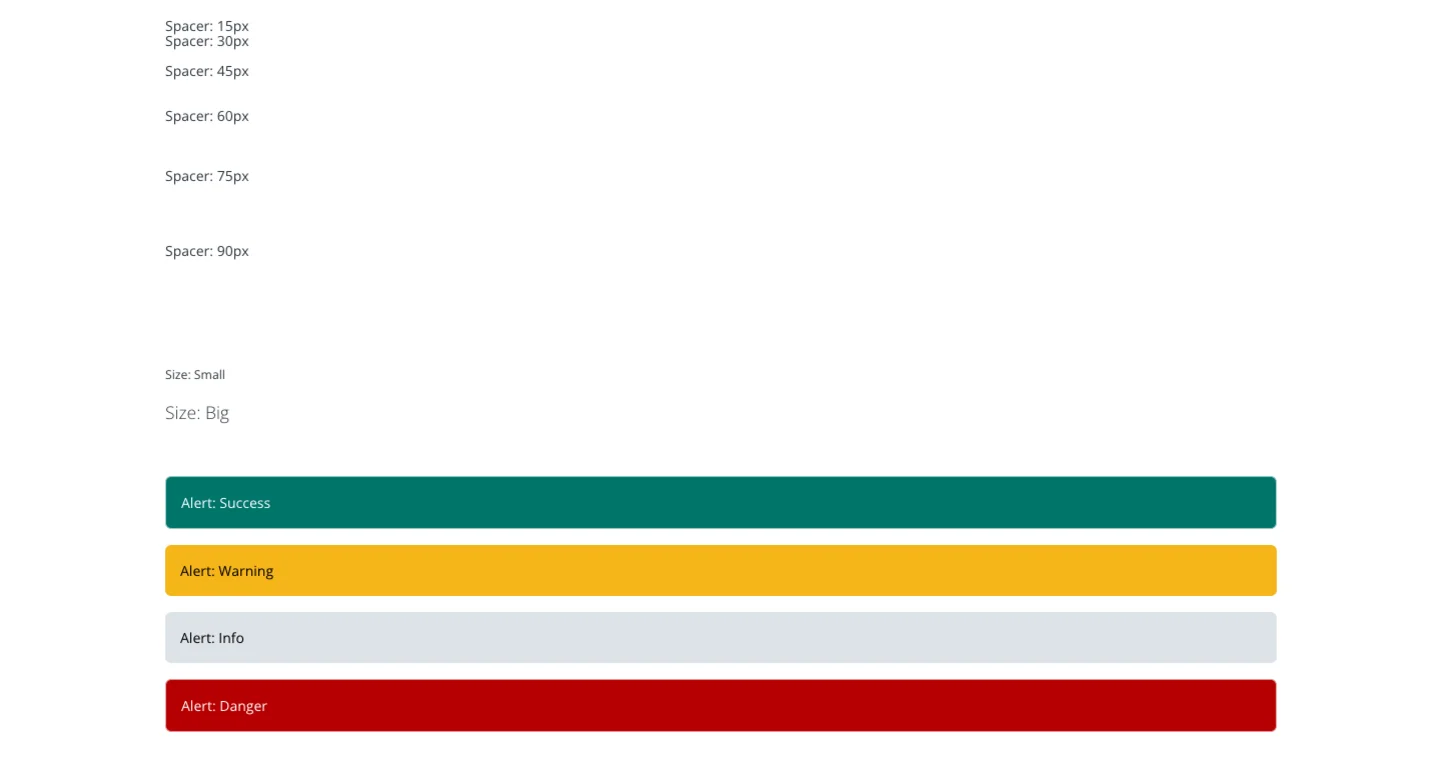
- Spacer: 15, 30, 45, 60, 75 and 90 px (defined distance between two paragraphs)
- Size: small and big (whole section in small or big font size)
- Alert: Success, Warning, Info and Danger (colored area around the text)
In order to apply text styles, you need to mark corresponding areas, sentences or words for them. Then, as with block styles, select the format you want from the dropdown menu.
The following text styles are available:
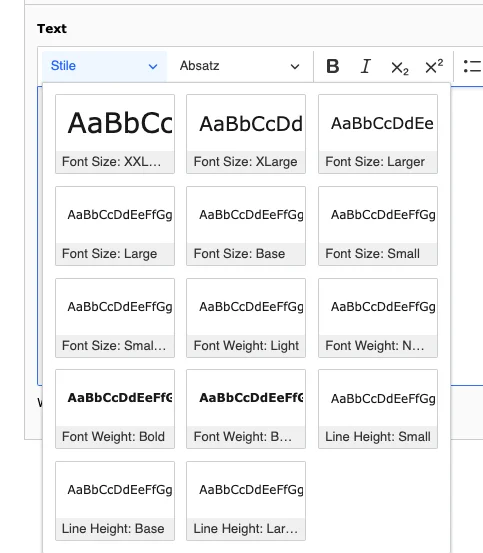
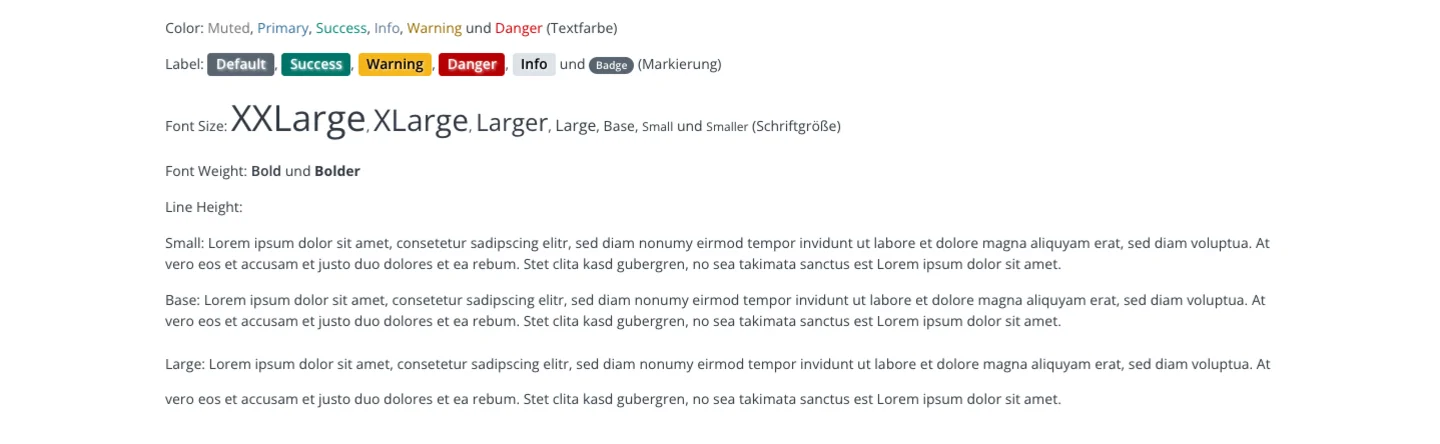
- Color: Muted, Primary, Success, Info, Warning and Danger (text color)
- Label: Default, Success, Warning, Danger, Info and Badge (marker)
- Font Size: XXLarge, XLarge, Larger, Large, Base, Small and Smaller
- Font Weight: Bold and Bolder
- Line Height: Small, Base, Large (line spacing)

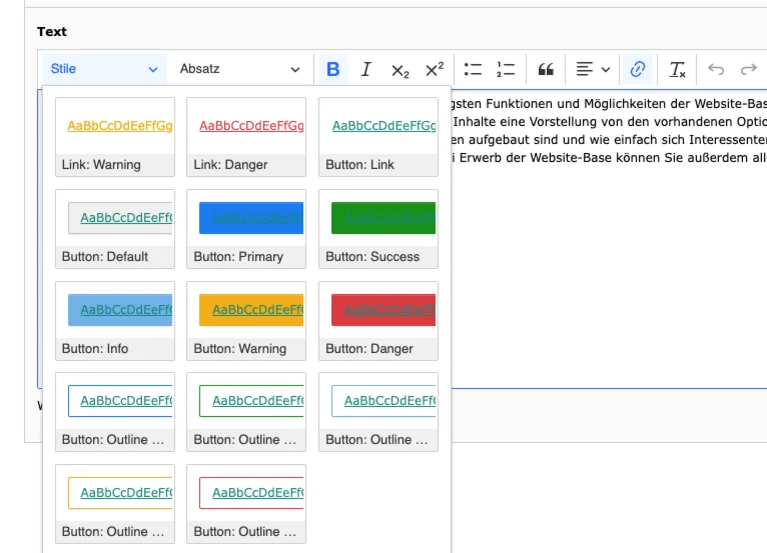
The following text styles are additionally available for links:
- Link: Primary, Secondary, Success, Info, Warning and Danger (link color)
- Button: Link, Default, Primary, Success, Info, Warning and Danger (link as button in a specific color)
- Button: Outline: Primary, Success, Info, Warning and Danger (link as a button with a frame in a specific color, on mouseover the button is filled with the line color)


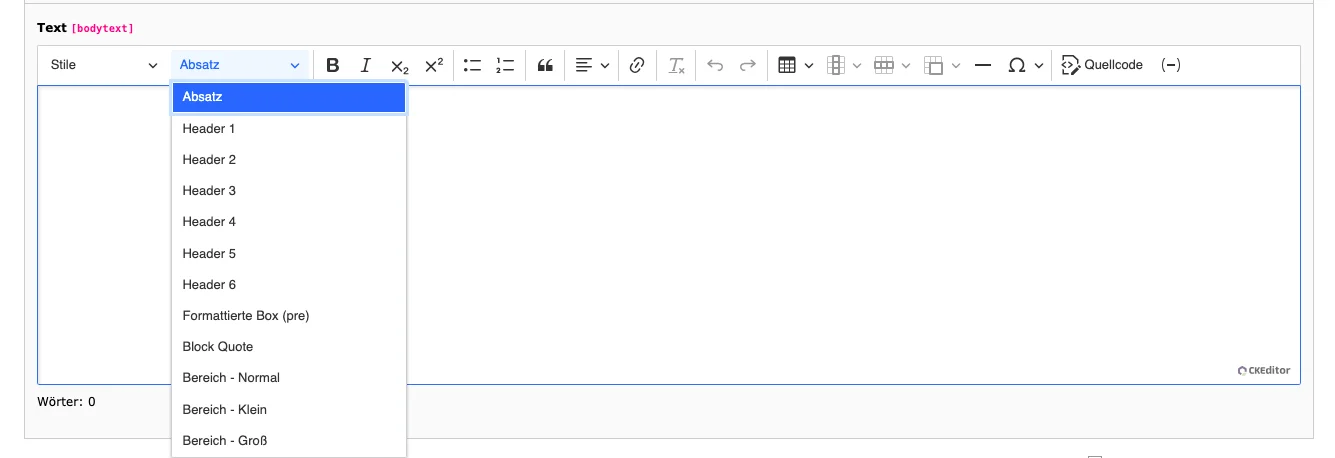
Paragraph
The second drop-down menu is called Paragraph. Fittingly, these styles always affect a paragraph. Here you will find:
- Headings 1 to 6
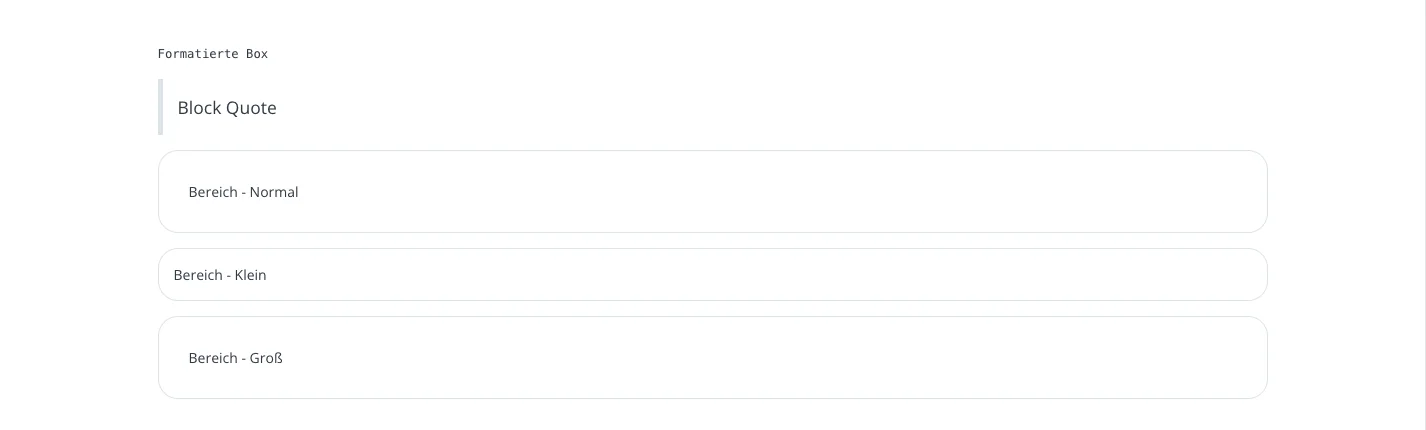
- Formatted box
- Block Quote
- Area - Normal, Small and Large

Bold, Italic, Subscript, Superscript & Lists
Bold, Italic, Subscript, Superscript and Lists are typical options in common text editing programs. They are used in the RTE in the same way as in other programs.
- Select the character, word, phrase or line to be displayed in bold, italics, subscript, superscript or as lists.
- To remove the formatting, click in a formatted word or list entry or select a group of words and 'turn off' the option by unsing the selected icon again.


- For lists, you can alternatively start a new line and then select one of the two list options. Each additional line is a new list entry.
- Several formatting options can be easily combined with each other.
- Two other ways to remove a formatting are the Remove Format option and the Source code.
Text Alignment
Align Left, Center, Align Right and Justify

The text alignment can also be designed individually for each paragraph. Simply click into a paragraph and select the alignment. If you want the text to be aligned differently again, simply select a different option. The alignment can also be deleted with Remove Format and changed in the Source code. By default, the text is left-aligned.
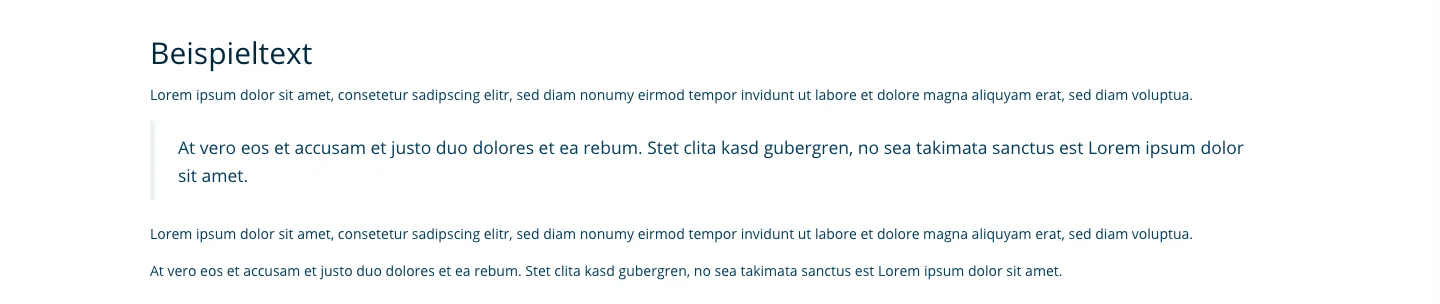
Block Quote
With a block quote, quotations can be highlighted in a special way.
Remove formatting
If you want to remove a style, click in the affected place in the text and choose the already selected format in the dropdown menu. If this does not work, there are two other ways to remove a formatting. In the Source section, we will introduce you to another method of removing unwanted formatting.
Remove text style

It is not always possible to remove the formatting with the button above the text. If it is possible (normally only for text styles, but not for link styles), the otherwise grayed-out symbol turns black, as do most other symbols. The formatting can then be removed. Select the area in the text where the formatting is to be removed and use the Remove formatting button. Other formatting can be removed, e.g. using the method described above or in source mode.
Links
Insert/Edit a Link
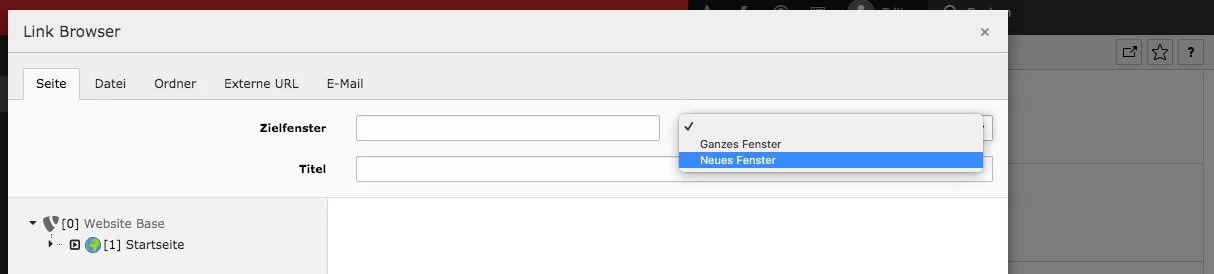
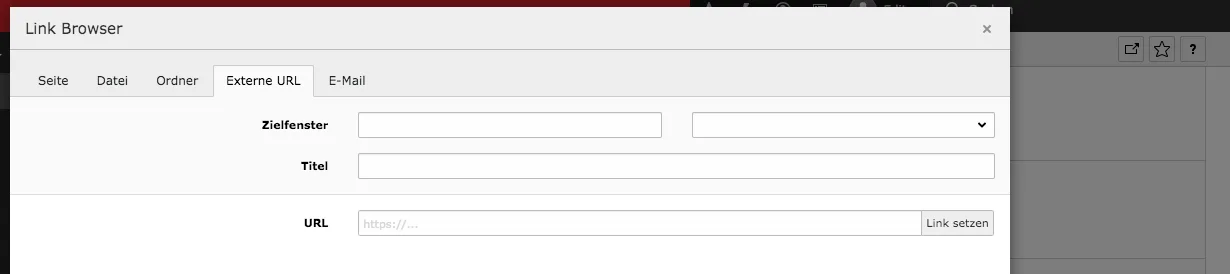
To link text, select a word or an entire phrase and go to the link icon. The Link Browser opens. It has six tabs. Each tab can be used to insert a link, they differ according to the type of link to be inserted: Page, File, Folder, External URL, Email, Telephone.
Linking works basically the same way every time. Most likely, you will link using the first tab - this is where you set internal links, i.e. links that point to URLs of your homepage.
At the top of the Link Browser, specify whether the link should be opened in a new tab/window (Target). If you do not select anything at this point, the link will be opened in the current browser tab. The title of the link is displayed when a user moves the mouse over the link, fill it out if required.
Insert an internal link as follows:
- Select the target window and assign a title.
- Unfold the page tree in the left part of the Link Browser (click on the arrow on the left).
- Select:
- If you would like to link to the page, click on the Link to page XYZ button.
- If you want to link directly to a page content, click on one of the listed page contents below the button.
- To edit a link, click into the link in the text and open the link browser with the link button.
- To remove a link, go on the link in the text and then use the second link icon with the cross (Unlink).
The right link browser area lists the contents of a page with the assigned headers. In order to uniquely identify content, each content element must have an individual heading (this can also be hidden).
There are special link styles for links. These can be used to display links in color or as buttons. In the frontend, links are identified by a hover effect.
Tables
Tables can be created similar to text processing programs. At the beginning, you choose how many rows and columns the table should consist of. At any time you can add rows and columns or merge cells. You have all the typical options for editing a table. When you click in the table, the various options for editing the table always appear.
Column & Row
The first two options relate to the columns or rows:
- Header column/header row (activate/deactivate via the slider)
- Insert column left/right & Insert row top/bottom
- Delete column/row
- Select column/row
Merge cell
You will find the options for columns, rows and cells not only when clicking in the table, but also next to the option to create tables. The following options are available for cells:
- Merge cell
- Merge cell right/left/top/bottom
- Split cell vertically/horizontally
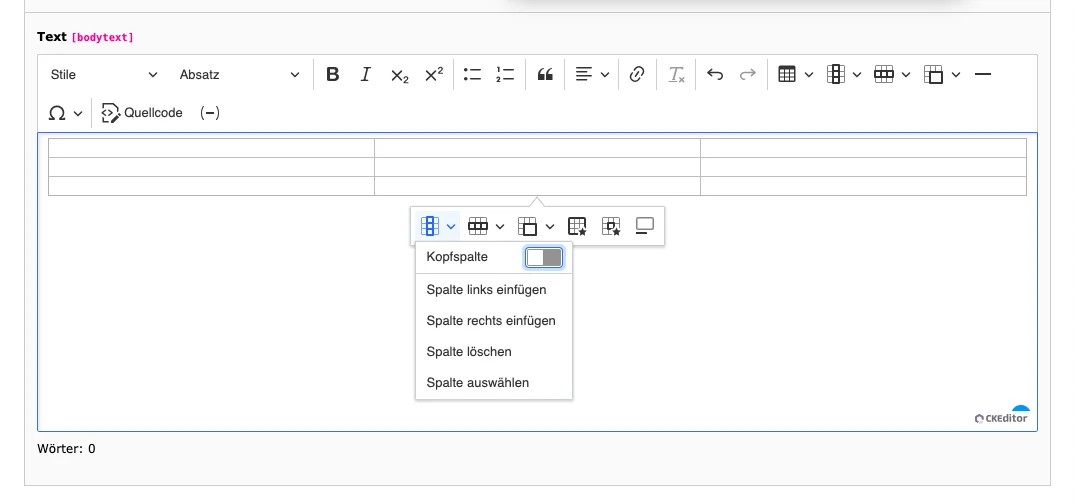
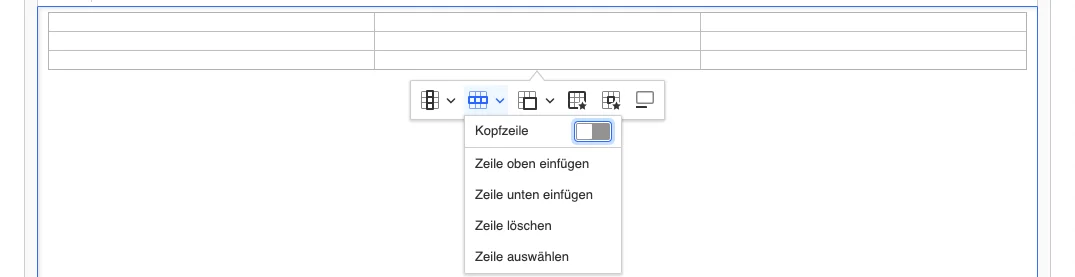
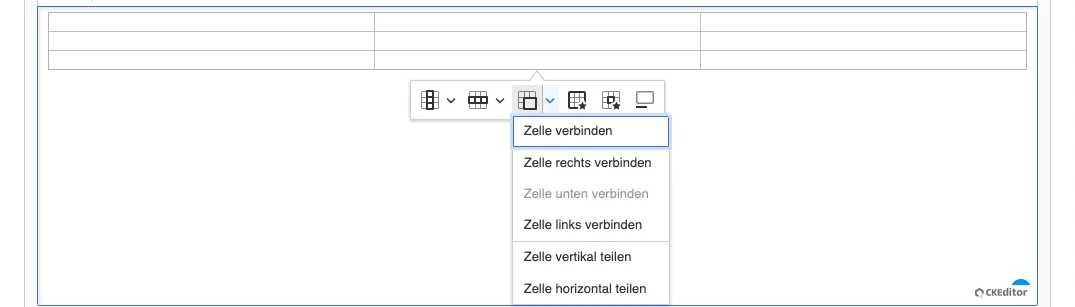
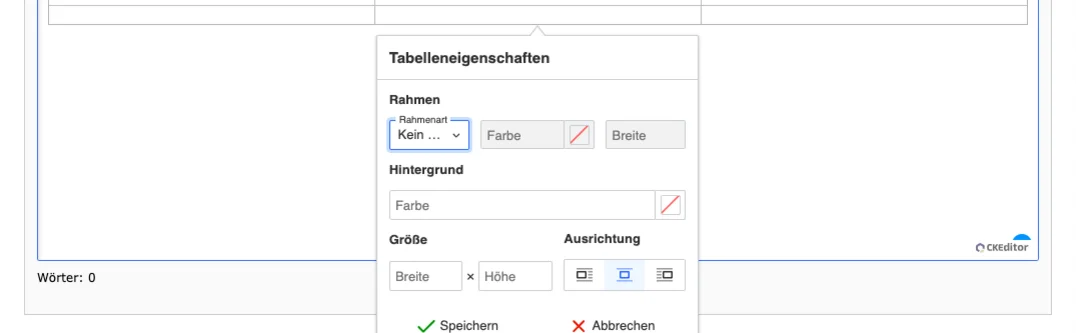
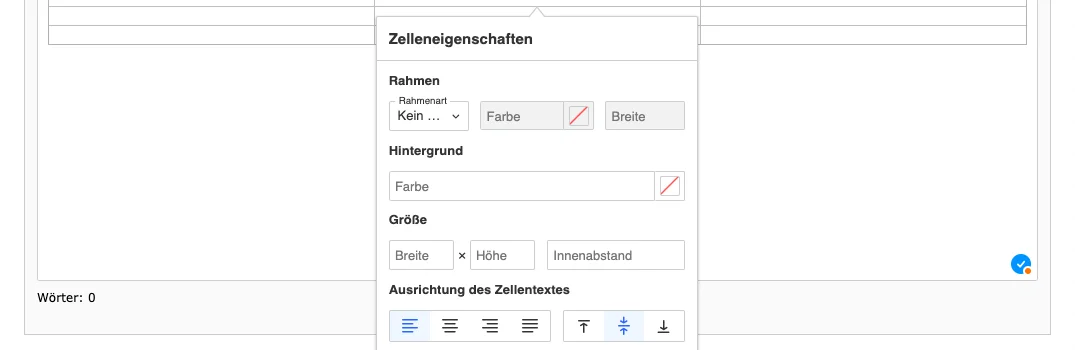
Table Properties & Cell Properties
The properties for tables and cells are almost identical. The following options can be customized:
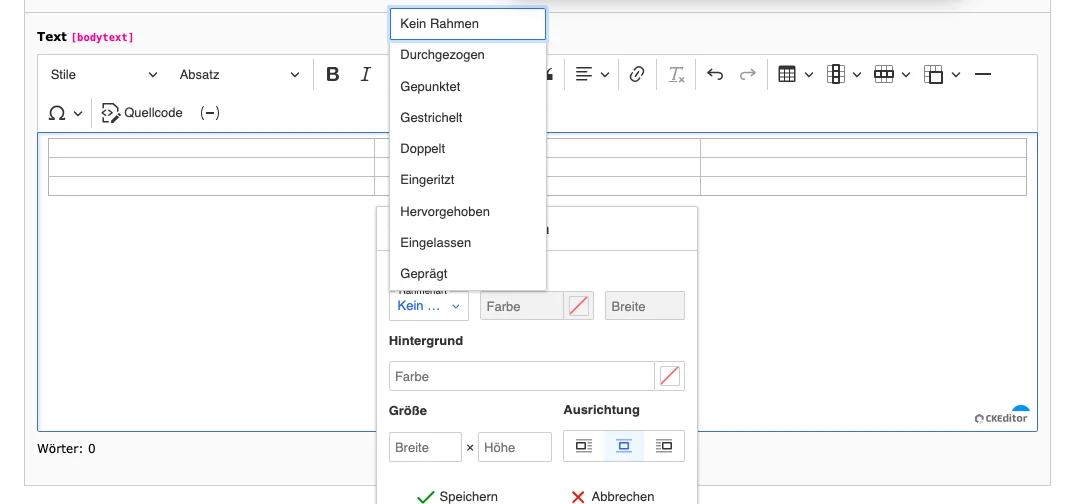
- Border: Border style, color and width
- Background: Color
- Dimensions: Width x Height, padding (only for cells)
- for tables – Alignment: Align table left/right, center table
- for cells – Table cell alighment: Align cell text left/center/right/Justify text & Align cell text to the top/center/bottom
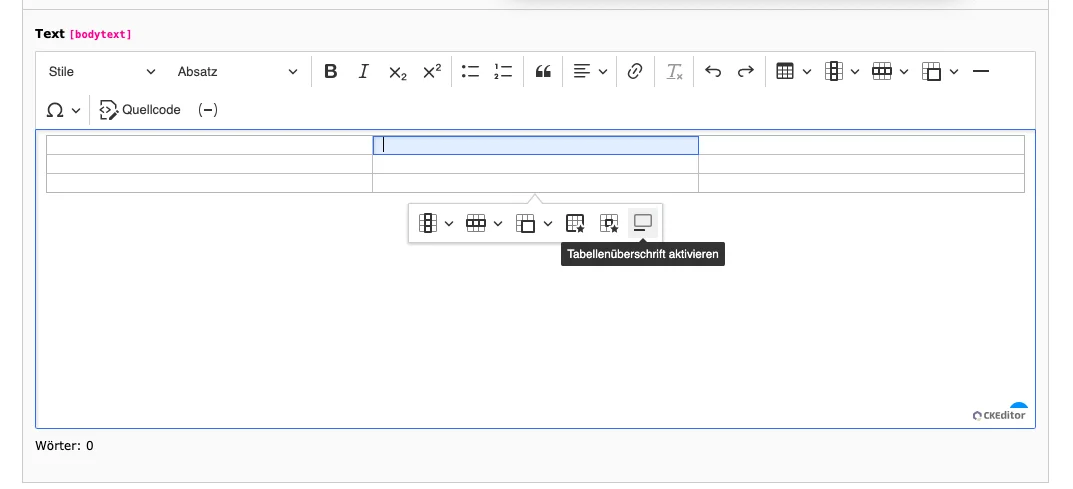
Toggle caption on
Finally, you can specify whether your table should have a heading.
Undo & Redo

You can go back or repeat a few steps in the text at any time. To do so, use the shortcuts CTRL + Z for undo and CTRL + Y for redo or use the corresponding arrow buttons in the RTE.
Insert Horizontal Line
A horizontal line can be used to visually separate content, as shown in the screenshot below.

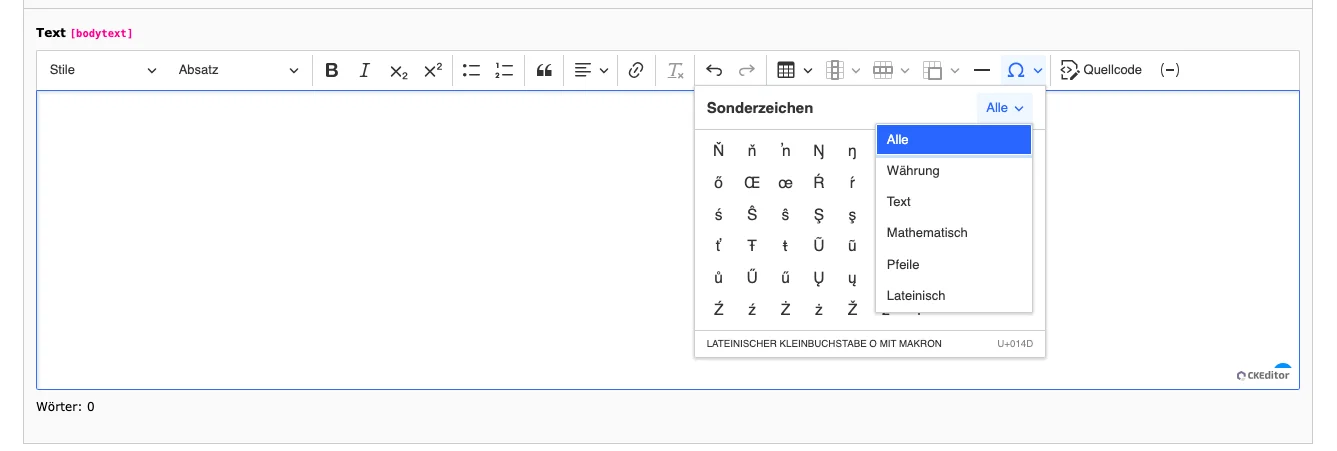
Insert Special Character
If necessary, special characters can be inserted into the text at any time. Just use the icon for the special characters and a window with the selection will appear. Click on the required character: The window closes and the special character appears in the text.
Conditional hyphen
Long words can be problematic, especially with texts on a small area, as the distribution of the text in the lines can become very uneven. In such cases, for example, you can insert a conditional hyphen at a suitable point. This means that if a word can be separated at the position in the frontend, it will also be displayed separately. If there is not enough space in the line, the word with the conditional hyphen will still be moved to the next line.
You can also recognize conditional hyphens in the text editor, as can be seen in the screenshot.

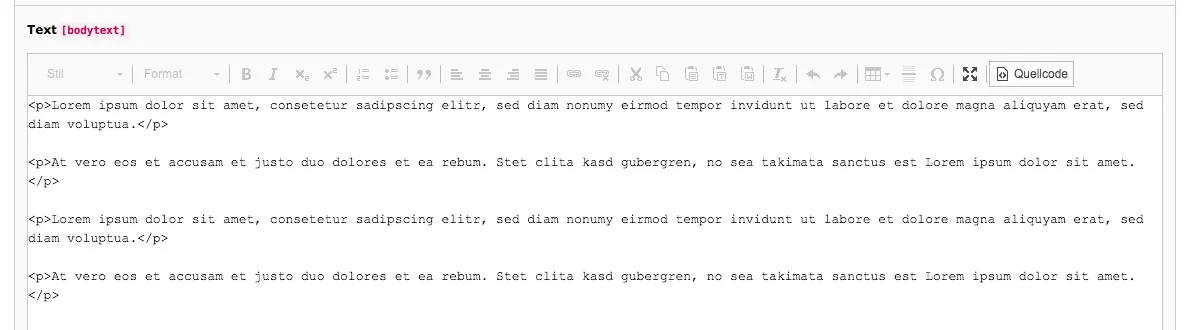
Source
The source code is generally not necessary for the editor, but sometimes it can be useful to have this mode, e.g. when inserting text or removing unwanted formatting.
When inserting text, you simply switch to source and insert the text, so no formatting is transferred or special characters are set. In normal mode the text can then be edited as usual.
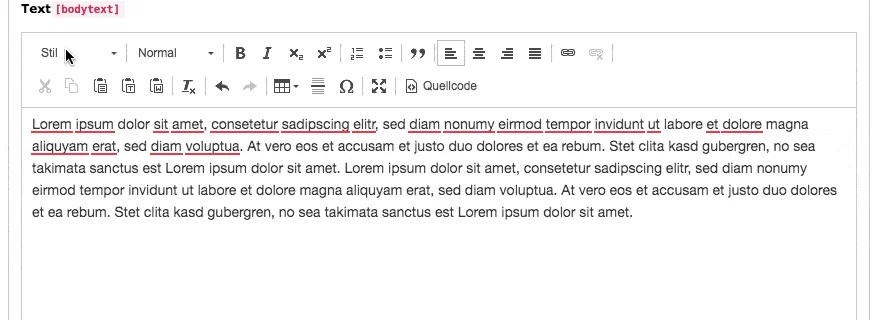
Even if you write and edit the text in the editor first, for example, protected spaces can sneak in, which can lead to unsightly paragraphs. You will not see them in normal mode, but they will affect the appearance of the text in the frontend. In the source code, look for the code snippet:& n b s p ;. You will need to remove this code snippet, especially if it is in the middle of the text. However, this rarely happens now, as protected spaces are also marked with a pink highlight in normal mode.
Sometimes, however, a protected space can also be useful if, for example, certain groups of words or numbers with associated unit should not be separated from each other. In such cases, you can deliberately use this string in source code mode.
Normal text in the source code starts with <p> and ends with </p>. If unwanted formatting cannot be removed using other methods, examine the text in the source code and remove all other code snippets to obtain normal text.
Would you like to know more?
All information about the available editions can be found on the webpage for our TYPO3 Website-Base. You have the possibility to get a Website at a Fixed Price or you decide for a Website as a Service package, with which no further costs for hosting or security and function updates will come up to you.
